
E-MU XL-7
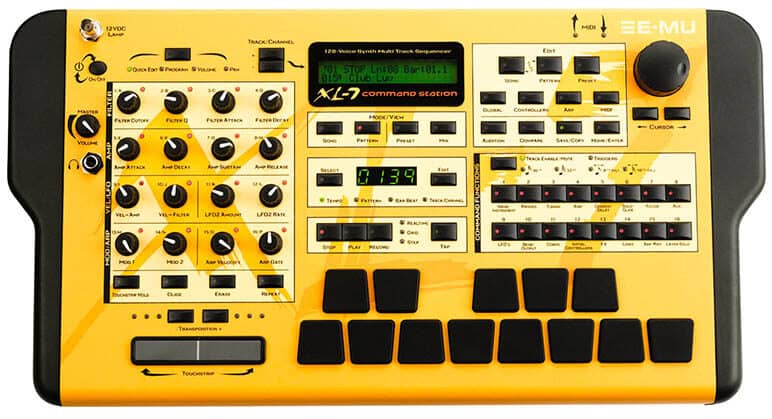
The E-MU XL-7 is a MPC-style desktop sequencer and uses the same sample-playback synthesis engine of the Proteus 2000. The sound ROM is based on the same sample set of the X-Lead, but with 329 different presets (318 compared to X-Lead v1.4). This ROM has more “kits” type presets as the original X-Lead is more “beats” oriented.
Technical Specifications
ROM Size: 32MB
Sample Rate/Bitrate: 44.1kHz 16-bit
Presets: 1024 (512 RAM, 512 ROM)
Instruments: 1210
SIMM Sockets: 4
SuperBEATS Mode: Yes
Polyphony: 128 Voices
MIDI Channels: 32
Filters: 50 Z-Plane
FX: 76
MIDI Ports: 3
Audio Outs: 6
Digital Outs: S/PDIF
Foot Switch Ports: 2
USB: Yes
SIMM Specifications
SIMM Code Number: 14
Label: XL-7
LCD Display Name: XL-7
Banks: 4 Banks
Preset & Instrument Listing
000. kit:K-0
001. kit:K-1
002. kit:K-2
003. kit:K-3
004. kit:K-4
005. kit:K-5
006. kit:K-6
007. kit:K-7
008. kit:K-8
009. kit:K-9
010.kit:K-10
011. kit:K-11
012. kit:K-12
013. kit:K-13
014. kit:K-14
015. kit:K-15
016. kit:K-16
017. kit:K-17
018. kit:K-808
019. kit:K-909
020. kit:Acoustic 1
021. kit:Acoustic 2
022. kit:Hybrid
023. kit:Hard 1
024. kit:Hard 2
025. kit:K-1 HPF
026. kit:K-1 up 9
027. kit:K-2 millini
028. kit:K-3 LFO~LPF
029. kit:K-4 LFO~AMP
030. kit:K-5 Octave
031. kit:K-5 up 7
032. kit:K-5 Klub
033. kit:K-6 Chorus
034. kit:K-7 LFO~REZ
035. kit:K-8 16tsPan
036. kit:K-8~8 go
037. kit:K-9 D-Pan
038. kit:K-9 up 12
039. kit:K-10 D-Up
040. kit:K-10 High Q
041. kit:K-11 T-Dly
042. kit:K-12 Q-Dly
043. kit:K-13 QP-Dly
044. kit:K-14 D-Down
045. kit:K-15 D-D2
046. kit:K-16 Tremor
047. kit:808 Delay
048. kit:Envelope
049. prc:Kicks 1
050. prc:Kicks 2
051. prc:Solo Kick 1
052. prc:Solo Kick 2
053. prc:Snares 1
054. prc:Snares 2
055. prc:Snares 1 +7
056. prc:Snares 2 Eff
057. prc:Snares 2 Rev
058. prc:Snare Fill 1
059. prc:Snare Fill 2
060. prc:Ambi Snare
061. prc:Toms & Stuff
062. prc:Congas etc 1
063. prc:Congas etc 2
064. prc:Hats 1
065. prc:Hats 2
066. prc:Solo Hat 1
067. prc:Solo Hat 2
068. prc:Tambs
069. prc:Cymbals
070. prc:Shakers etc.
071. prc:Bells
072. prc:Blocks
073. prc:Claps/Snaps
074. prc:Misc
075. prc:Warehouse
076. prc:Scratches 1
077. prc:Scratches 2
078. prc:Tic a Tak
079. prc:Ubu Delay FX
080. hit:Enrezzle
081. hit:PLATINUM
082. hit:Voxy
083. hit:Krunchy
084. hit:Dreamer Tags
085. hit:Boink-King
086. hit:Nice 1
087. hit:Nice 2
088. hit:Nice 3
089. hit:Logger
090. hit:Dance 1
091. hit:Dance 2
092. hit:Dance 3
093. hit:Dance 4
094. hit:Dance 8
095. hit:Dance 11
096. hit:Dance 12
097. hit:Dance 14
098. hit:Dance 16
099. hit:Dance 20
100. hit:Dance 21
101. hit:Dance 22
102. hit:Dance 23
103. hit:Dance 24
104. hit:Dance 25
105. hit:Dance 26
106. hit:Organ 3
107. hit:Organ 4
108. hit:Organ 5
109. hit:Organ 6
110. hit:UnisonString
111. hit:Unison Brass
112. hit:Brass 6
113. hit:Brass 7
114. hit:Brass 9
115. hit:Brass 18
116. hit:Trumpet FX 1
117. hit:Trumpet FX 2
118. hit:Sax FX
119. hit:Blipp
120. hit:Buzz Blip
121. hit:Game
122. hit:Bell
123. hit:CMI
124. hit:Bass Stab
125. hit:H G
126. hit:H G Dive
127. hit:Drum Stab
000. syn:Basic Saw
001. syn:ORiON
002. syn:Spiders
003. syn:Nordica
004. syn:Sync4Sequenc
005. syn:Tink Or Toy
006. syn:Kyng Doam
007. syn:70-64
008. syn:12-30
009. syn:Trancer
010. syn:MortalSynth
011. syn:The Grid
012. syn:Calmer
013. syn:Cyborg
014. syn:South Euro 1
015. syn:South Euro 2
016. syn:Big E
017. syn:Riverdancing
018. syn:Air Age
019. syn:Trem String
020. syn:OBX
021. syn:40-10
022. syn:12-20
023. syn:3 O 3
024. syn:Geaxoils
025. syn:XtoZ
026. syn:Munster
027. syn:Booty Qooty
028. syn:Uborator
029. syn:Prophety
030. syn:Raved Pass
031. syn:D Pee
032. syn:Jesuasynth
033. syn:Wavetable
034. syn:Minor Evil
035. syn:Profit Brass
036. syn:Sweepy
037. syn:Glider
038. syn:Grumpy
039. syn:Gothica
040. syn:Too Big
041. syn:Echoing
042. syn:Screamer
043. syn:Electric
044. syn:CZ BIG
045. syn:SinEnsemble
046. syn:BigDandyBoy
047. syn:Willy 4
048. syn:R&B Stegas
049. syn:60-30
050. syn:SweetDream
051. led:Wet
052. led:Cyber 1
053. led:Cyber 5
054. led:Cyber 6
055. led:Cyber 7
056. led:Saturn
057. led:More Senses
058. led:Wormy 2
059. led:Wormy 3
060. led:Zeaxy 2
061. led:Brixx 2
062. led:Apoly 1
063. led:Fat S12
064. led:Fat CL1
065. led:Fat INT
066. led:Groove Wow
067. led:Alter 4
068. led:Alter 6
069. led:Synrg 7
070. led:Synrg 9
071. led:Fat Saw
072. led:Scizy 2
073. led:Scizy 4
074. led:Jungle X
075. led:Hypass Ditty
076. led:Heavy
077. led:Dreamlead
078. led:Duzbe 2
079. led:Fuzzer
080. led:Weezel
081. led:Noise F
082. led:P Mod 1
083. led:DesertTrance
084. led:TB 2
085. led:Metallic
086. led:PureSaw
087. led:Wormsine
088. led:Technoval
089. led:Falling
090. led:Scizy 2
091. pad:Rumble Pad
092. pad:Super Pad
093. pad:ARK Covet
094. pad:E P I C
095. pad:Sleepy
096. pad:Tecnorise
097. pad:Cvox
098. pad:Soft Trace
099. pad:Ice Dreams
100. pad:Big Chief
101. pad:Slow Dance
102. pad:Warm&Lush
103. pad:Art Deko
104. pad:Daddy’s Girl
105. pad:Strings Box
106. pad:Hi&LowLight
107. pad:Vespers
108. pad:Ambi Pad
109. pad:Pure Synth
110. pad:HarmonicLift
111. pad:Lunar Trail
112. pad:Cryo Stasus
113. pad:Genesis
114. pad:Dark City
115. pad:SlogritStrng
116. pad:SaturnRings
117. pad:Smoovie
118. pad:Aki’s World
119. pad:Low Back
120. pad:www.f mono
121. pad:Spelunkers
122. pad:Lifedream
123. pad:Perception
124. pad:Involved
125. pad:Lo Fi String
126. pad:AmbString 1
127. pad:AmbString 2
000. bas:Top Tri
001. bas:UK shoota
002. bas:Love Bee
003. bas:Jump Up
004. bas:Sub Duh
005. bas:Hybrid Phase
006. bas:A.D. 3033
007. bas:Vortex
008. bas:Saws Normal
009. bas:1 Shot
010. bas:Hard X
011. bas:Pinhead
012. bas:Go Long
013. bas:Square V
014. bas:H20
015. bas:Interference
016. bas:B-Acer
017. bas:P-dg
018. bas:Fatso
019. bas:F16
020. bas:Acid 7
021. bas:Sonic
022. bas:Bullit
023. bas:Dance II
024. bas:Rippedbass
025. bas:Depth
026. bas:Arplikebass
027. bas:Fat Arc
028. bas:PPX 1
029. bas:PPX 2
030. bas:Jungle Sub
031. bas:Fat Juno
032. bas:Smooth
033. bas:Heavy B
034. bas:Sub E
035. bas:S-Bass
036. bas:Thwip
037. bas:Log Bass
038. bas:Disser
039. bas:Sunny
040. bas:HardHouse
041. bas:Garage Sub
042. bas:Planet X
043. edg:Boxt
044. edg:Matrix
045. edg:Honker
046. edg:Analog Beast
047. edg:Zorkon
048. edg:AudKlav
049. edg:Scrape
050. edg:Hlywd Native
051. edg:Ringer
052. edg:Bare Edge
053. edg:Spawn
054. edg:Rez Zip
055. edg:FuzzGrinder
056. edg:Love All
057. edg:Squeake
058. edg:2 Flange
059. edg:Teeth
060. edg:Slicer
061. edg:Skreecher
062. edg:Love Hurts
063. wal:Strangled
064. wal:The Macheen
065. wal:Duckfuzz
066. wal:C-Ride
067. wal:HoverCraft
068. wal:Clavonate
069. wal:DailyBread
070. wal:I made it
071. wal:Backdraft
072. wal:Mammoth
073. wal:Maryland
074. wal:Thickets
075. wal:Ice Ring
076. wal:Silkness
077. wal:Byzantine
078. wal:Raverotic
079. wal:Ripped
080. wal:Balls2The..
081. wal:W6 3sEvEn
082. wal:Abyss
083. wal:GoSpeedRacer
084. wal:Tension
085. wal:Big Wall
086. wal:Luscious
087. nse:Interfear
088. nse:Diffuser
089. nse:Radon Shield
090. nse:That’sCreepy
091. nse:Future Steps
092. nse:LittleWeasel
093. nse:Martians
094. nse:Cast
095. nse:SpottedWhite
096. nse:Heavy Mental
097. nse:Hadrian’s
098. nse:Machined
099. nse:Rezawrect
100. nse:Massive
101. nse:Soline 7x
102. nse:Quiet Wall
103. nse:Bottom Floor
104. nse:Distructor
105. nse:Undertaker
106. nse:Coyote
107. nse:Turbonic
108. nse:GrainyPixel
109. nse:Faucet Drip
110. nse:Psychic Sea
111. nse:Aarno Ldt
112. key:Smarm Organ
113. key:Disca Queen
114. key:Rave Organ
115. key:Organik
116. key:SynhissOrgan
117. key:Deep Organ
118. key:P-soul
119. key:TechnoGrand
120. key:Ocean
121. key:HybridTine
122. key:EP Roll 1
123. key:EP Roll 2
124. key:EP Fog
125. gtr:Guit Hits
126. gtr:Univibe
127. gtr:Clicky Picky
000. arp:Deeper Love
001. arp:Glider
002. arp:Alloy M
003. arp:JUNOsis
004. arp:A Trip
005. arp:Dreamer
006. arp:Palomar
007. arp:Raving
008. arp:Robo Trace
009. arp:Glory II
010. arp:Hollographic
011. arp:Pele
012. arp:Lust II
013. arp:Bottom Perc
014. arp:You Know It
015. arp:X-light II
016. arp:OrbisTabula
017. arp:OrbisPitcher
018. arp:The Grind
019. arp:Tron X
020. arp:Dry Wastland
021. arp:Axis One
022. arp:Bouchete
023. arp:Saw Standard
024. arp:Phrophetics
025. arp:Sine Drum
026. arp:Gutter Punk
027. arp:MooGie-D
028. arp:No Lo
029. arp:Sanctuary
030. arp:Pissto Hi
031. arp:T-2000
032. bpm:Bouncerette
033. bpm:Traveler
034. bpm:Boogy Synth
035. bpm:Lighter
036. bpm:End
037. bpm:E Room
038. bpm:Monster
039. bpm:Peak 7
040. bpm:Cult-feel
041. bpm:Love II
042. bpm:Synthex 90′
043. bpm:Underclass
044. bpm:Tempo LFOs
045. bpm:Carpe Diem
046. bpm:L Room
047. bpm:Reepeter
048. bpm:Solace
049. bpm:GRITS
050. bpm:TRIPPER
051. bpm:Higher Power
052. bpm:Trashy
053. bpm:Vision
054. bpm:Wading
055. bpm:Grinded
056. bpm:Electon
057. bpm:Bubbler
058. bpm:End
059. bpm:Wicked Low
060. bpm:RadioDaze
061. bpm:Panhandel
062. bpm:Minator
063. bpm:Lucy-Q
064. air:Bat Pann
065. air:GhostStories
066. air:Breath Stack
067. air:Tibet
068. air:Futura
069. air:Air Surf
070. air:Eastern Mist
071. air:Vampirella
072. air:Floater
073. air:Warm Chill
074. air:Digital Noiz
075. air:Scary Noise
076. air:StickyFinger
077. air:LeaveMeAlone
078. air:Breathless
079. air:FluteState
080. vox:LuciferDom
081. vox:Upper Bottom
082. vox:QVoxDelay
083. vox:Aah Eeh
084. vox:Choirish
085. vox:Ooh,Voices!
086. vox:Lushorch Vox
087. vox:Toxic Vox
088. vox:Zephyr
089. vox:Air Voices
090. vox:SIRRUS
091. vox:Future Vox
092. vox:Bliss
093. vox:ARMAGEDDON
094. vox:ANGELIKA
095. vox:Galaxal
096. vox:Bandvoxxe
097. vox:Exploration
098. vox:AfterShock
099. vox:Surfacing
100. vox:Ethereal
101. vox:Suffocating
102. vox:Space Voxxal
103. sfx:Moby’s Trip
104. sfx:Odd Quasar
105. sfx:S-METAL
106. sfx:Zoned
107. sfx:OverTheEdge
108. sfx:Granules
109. sfx:Glassers
110. sfx:Alienator
111. sfx:Ripped Lazer
112. sfx:FoldingSpace
113. sfx:Uncertainty
114. sfx:CosmicCompny
115. sfx:REZA’S LaB
116. sfx:TerrorZoNE
117. sfx:LupeDeKool
118. sfx:CyberSience
119. bel:Modular Ring
120. bel:Efemm Bellsa
121. bel:Mult-A-Metal
122. bel:Mystery Bell
123. bel:NordicCalm
124. bel:Rainbellz
125. bel:Agualla Bell
126. bel:Capsulate
127. :XL-7 default
000. None
001. Sine Wave
002. Saw Wave
003. Square Wave
004. Triangle Wave
005. Audity Saw
006. Audity Square
007. Audity Blend
008. Audity Sync
009. Audity Sync
010. Audity Sync 1
011. Audity Sync 2
012. Audity Sync 3
013. Audity PWM 1
014. Audity PWM 2
015. Audity PWM 3
016. Ring Mod 1
017. Ring Mod 2
018. Ring Mod 3
019. Metal Wave
020. Jungle Lead
021. Metalik
022. Brass Lead 1
023. Brass Lead 2
024. Audity Lead 1
025. Audity Lead 2
026. Audity Lead 3
027. Audity Lead 4
028. Audity Lead 5
029. Audity Lead 6
030. Audity Lead 7
031. Audity Lead 8
032. Audity Lead 9
033. Audity Lead 10
034. Audity Lead 11
035. Classic Lead 1
036. Classic Lead 2
037. Classic Lead 3
038. Classic Lead 4
039. Digi Lead
040. Audity Synth 1
041. Audity Synth 2
042. Audity Synth 3
043. Audity Synth 4
044. Audity Synth 5
045. Audity Synth 6
046. Audity Synth 7
047. Audity Synth 8
048. Audity Synth 9
049. Audity Synth 10
050. Audity Synth 11
051. Audity Synth 12
052. Audity Synth 13
053. Audity Synth 14
054. Audity Bass 1
055. Audity Bass 2
056. Audity Bass 3
057. Acid Bass 1
058. Acid Bass 2
059. Acid Bass 3
060. Acid Bass 4
061. Acid Bass 5
062. Acid Bass 6
063. Acid Bass 7
064. Acid Bass 8
065. Acid Bass 9
066. Acid Bass 10
067. Hybrid Bass 1
068. Hybrid Bass 2
069. Hybrid Bass 2b
070. Dance Bass 1
071. Dance Bass 2
072. Mikro Bass
073. Shush Bass
074. Fuzz Bass
075. Flange Bass
076. Buzz Bass
077. Booty Q Bass 1
078. Booty Q Bass 2
079. Zodiac Bass 1
080. Zodiac Bass 2
081. Prodigal Bass
082. Zeek Bass
083. Audity Bell 1
084. Audity Bell 2
085. Audity Bell 3
086. Audity Bell 4
087. Audity Bell 5
088. Vox Humana
089. Vapor Vox
090. Chronic Vox
091. Vox Wave 1
092. Vox Wave 2
093. Vox Wave 3
094. Vox Wave 4
095. Vox Wave 5
096. Vox Wave 6
097. White Noise
098. Pink Noise
099. Audity Wall 1
100. Audity Wall 2
101. Audity Wall 3
102. Audity Wall 4
103. Audity Wall 5
104. Audity Wall 6
105. Audity Wall 7
106. Noise Tunnel
107. Air Pipe
108. Crystal Cavern
109. Sonar
110. Audity Edge 1
111. Audity Edge 1b
112. Audity Edge 1c
113. Audity Edge 2
114. Audity Edge 3
115. Future World
116. Grinder
117. Growly
118. Cricket
119. Fuzz Ball
120. Droid Scrape
121. Rez Honk
122. Krunchy Hit
123. Turbo
124. Interference
125. 1 Shot Bass
126. 1 Shot Dis Bass 1
127. 1 Shot Dis Bass 2
128. 1 Shot Dis Bass 3
129. 1 Shot Perc Bass
130. 1 Shot Grind
131. 1 Shot Siren
132. 1 Shot Turbine
133. 1 Shot Alien
134. 1 Shot Laser Rip
135. 1 Shot Aud Vox
136. 1 Shot Scratch 1
137. 1 Shot Scratch 2
138. 1 Shot Scratch 3
139. 1 Shot Scratch 4
140. Looped Perc 1
141. Looped Perc 2
142. Looped Perc 3
143. Looped Perc 4
144. Looped Perc 5
145. Looped Perc 6
146. Looped Perc 7
147. Looped Perc 8
148. Looped Perc 9
149. Looped Perc 10
150. Looped Perc 11
151. Looped Perc 12
152. Looped Perc 13
153. Looped Perc 14
154. Looped Perc 15
155. Looped Perc 16
156. Looped Perc 17
157. Looped Perc 18
158. Looped Perc 19
159. Looped Perc 20
160. Looped Perc 21
161. Looped Perc 22
162. Looped Perc 23
163. Looped Perc 24
164. Looped Perc 25
165. Looped Perc 26
166. Looped Perc 27
167. Looped Perc 28
168. Looped Perc 29
169. Looped Perc 30
170. Looped Perc 31
171. Looped Perc 32
172. Looped Perc 33
173. Looped Perc 34
174. Looped Perc 35
175. Looped Perc 36
176. Looped Perc 37
177. Looped Perc 38
178. Looped Perc 39
179. Looped Perc 40
180. Looped Perc 41
181. Looped Perc 42
182. Looped Perc 43
183. Looped Perc 44
184. Looped Perc 45
185. Looped Perc 46
186. Looped Perc 47
187. Looped Perc 48
188. Looped Perc 49
189. Looped Perc 50
190. Looped Perc 51
191. Looped Perc 52
192. 1 Shot Perc 1
193. 1 Shot Perc 2
194. 1 Shot Perc 3
195. 1 Shot Perc 4
196. 1 Shot Perc 5
197. 1 Shot Perc 6
198. 1 Shot Perc 7
199. 1 Shot Perc 8
200. 1 Shot Perc 9
201. 1 Shot Perc 10
202. 1 Shot Perc 11
203. 1 Shot Perc 12
204. 1 Shot Perc 13
205. 1 Shot Perc14
206. 1 Shot Perc 15
207. 1 Shot Perc 16
208. 1 Shot Perc 17
209. 1 Shot Perc 18
210. 1 Shot Perc 19
211. 1 Shot Perc 20
212. 1 Shot Perc 21
213. 1 Shot Perc 22
214. 1 Shot Perc 23
215. 1 Shot Perc 24
216. 1 Shot Perc 25
217. 1 Shot Perc 26
218. 1 Shot Perc 27
219. 1 Shot Perc 28
220. 1 Shot Perc 29
221. 1 Shot Perc 30
222. 1 Shot Perc 31
223. 1 Shot Perc 32
224. 1 Shot Perc 33
225. 1 Shot Perc 34
226. 1 Shot Perc 35
227. 1 Shot Perc 36
228. 1 Shot Perc 37
229. 1 Shot Perc 38
230. 1 Shot Perc 39
231. 1 Shot Perc 40
232. 1 Shot Perc 41
233. 1 Shot Perc 42
234. 1 Shot Perc 43
235. 1 Shot Perc 44
236. 1 Shot Perc 45
237. 1 Shot Perc 46
238. 1 Shot Perc 47
239. 1 Shot Perc 48
240. 1 Shot Perc 49
241. 1 Shot Perc 50
242. 1 Shot Perc 51
243. 1 Shot Perc 52
244. 1 Shot Perc 53
245. 1 Shot Perc 54
246. 1 Shot Perc 55
247. 1 Shot Perc 56
248. 1 Shot Perc 57
249. 1 Shot Perc 58
250. 1 Shot Perc 59
251. 1 Shot Perc 60
252. 1 Shot Perc 61
253. 1 Shot Perc 62
254. 1 Shot Perc 63
255. 1 Shot Perc 64
256. 1 Shot Perc 65
257. 1 Shot Perc 66
258. 1 Shot Perc 67
259. 1 Shot Perc 68
260. 1 Shot Perc 69
261. 1 Shot Perc 70
262. 1 Shot Perc 71
263. 1 Shot Perc 72
264. 1 Shot Perc 73
265. 1 Shot Perc 74
266. 1 Shot Perc 75
267. 1 Shot Perc 76
268. 1 Shot Perc 77
269. 1 Shot Perc 78
270. 1 Shot Perc 79
271. 1 Shot Perc 80
272. 1 Shot Perc 81
273. Audity Scratches
274. El Perc Kit 1
275. El Kit 1 Looped
276. Kit 1 Env Loops
277. El Perc Kit 2
278. El Kit 2 Looped
279. Kit 2 Env Loops
280. Hybrid Perc
281. Warehouse Perc
282. Acoustic Perc A
283. Ac Kick+Snare B
284. Acoustic Kit A+B
285. Hardcore Kit 1
286. Hardcore Kit 2
287. Hardcore Kit 3
288. Hum
289. Below Sub
290. Super Sub
291. SE Sub 1
292. SE Sub 2
293. SE Sub 3
294. SE Sub 4
295. SE Sub 5
296. SE Sub 6
297. SE Sub 7
298. Hit
299. Subtle
300. Mem Moog
301. Lowness
302. Ice
303. Analow
304. Moog Tri
305. Moog Sub
306. Moogy
307. Fat Sun
308. Analog
309. Q 1
310. Q 2
311. Q 3
312. Planet
313. 2600
314. Synth 1
315. Synth 2
316. Synth 3
317. Synth 4
318. Synth 5
319. Synth 6
320. Synth 7
321. Synth 8
322. Synth 9
323. Synth 10
324. TB 1
325. TB 2
326. TB 3
327. TB 4
328. CZ101
329. PPG
330. Mini 1
331. Mini 2
332. Mini 3
333. Mini 4
334. Saw
335. Ultimate 1
336. Ultimate 2
337. Micro Moog
338. DB9 1
339. DB9 2
340. Phlappy
341. Power Q
342. Big Sync
343. Buzzer
344. Saw Sync
345. Pocket
346. Q Attack Sub
347. Sonics
348. Perco
349. Not So Mini
350. Spitt
351. Tap
352. Juno Sub
353. Complex Sub
354. Full Octave
355. Deep Pocket
356. JP4
357. Synth Hits
358. DX 1
359. DX 2
360. DX 3
361. EP 1
362. EP 2
363. EP 3
364. Home 1
365. Home 2
366. Street
367. Pure
368. Fing&Harms 1
369. Fing&Harms 2
370. All Purpose
371. Standard
372. Fretless 1
373. Fretless 2
374. Fretless 3
375. Fretless 4
376. Upright 1
377. Upright 2
378. Slap 1
379. Slap 2
380. Gruzzy Pop
381. Pop Slide 1
382. Pop Slide 2
383. Pop Slide 3
384. Pop Slide 4
385. Funk Hits
386. Organ 1
387. Organ 2
388. Mutes
389. Power 1
390. Power 2
391. Power Hit
392. Synth Axe
393. Hits
394. Pipe Organ
395. DrawbarOrgan
396. Perc Organ
397. Org Day
398. Disco Organ
399. DX Organ
400. JX Organ
401. Tone Organ
402. Simple Organ
403. Org Lite
404. Org Nod
405. Full Organ
406. Synth Organ
407. BreathyOrgan
408. Dance Organ
409. Farfisa 1
410. Farfisa 2
411. Vox Organ
412. Synth Cheeze
413. Organ Hits 1
414. Organ Hits 2
415. Tine EP
416. Pretty EP
417. Classic EP
418. FM EP 1
419. FM EP 2
420. EP Hits
421. Clavinet
422. Piano Wave
423. Xylo Pad
424. Pure H20
425. Log Hit
426. Pluck Tone
427. Hollow Deep
428. Bell Synth
429. Syn Tone
430. Perc Axe
431. Whine
432. CZ101 Digi
433. CZ Lead
434. CZ Echo Lead
435. Wild Synth
436. Spacey Keys
437. Digi Buzz
438. Rast Keys
439. ARP Sync
440. Narrow Synth
441. Fat Attack
442. ARP Lead
443. Synthetic
444. Overtone
445. Buzz Saw
446. Blipper
447. Full Synth
448. Bass Synth
449. Mini Lead
450. Sawtooth
451. M12 Lead
452. Sync Wave 1
453. Sync Wave 2
454. Sync Wave 3
455. Sync Wave 4
456. Sync Wave 5
457. Sync Wave 6
458. Pop Square
459. Juno Square
460. SquareAttack
461. Square Lead
462. SquareChorus
463. Sinusoid
464. Worm Lead 1
465. Worm Lead 2
466. Worm Lead 3
467. Worm Lead 4
468. Worm Lead 5
469. Worm Lead 6
470. Harmonica
471. Synth Flute
472. Soft Synth
473. Hi String
474. OBX Saws
475. Big Planet
476. JP6 Pad
477. Saw Sweep
478. Juno Pulse
479. CZ Synstring
480. Ensemble
481. Rezzy Wave
482. Heavy
483. Rezzy
484. Hi Octaves
485. Dreemy
486. Phat
487. Tekno
488. Life
489. Classic
490. Dreamer
491. Paddy
492. Dance Chord
493. Zoom
494. Keyngdom
495. Oddd Organ
496. Mood Strings
497. Brazz
498. Synthy
499. P5
500. Bari Wave
501. Sax Wave
502. Mute Trumpet
503. Trumpet FX 1
504. Trumpet FX 2
505. Cool Loops
506. Sax Riff
507. Boink
508. Classic Hit
509. Hits 1
510. Hits 2
511. Jax Breath
512. Synth
513. Orch
514. Soul Oohs
515. CMI Breath
516. Breathy
517. Tarzana
518. Gothic
519. Oow
520. Vox 1
521. Vox 2
522. Strings
523. All Dance 1
524. All Dance 2
525. Sound Track
526. Music Crowd
527. Lawn Mower
528. Riff Trip
529. Cyber Pan
530. Groove Thing
531. Science
532. Under Pad FM
533. Sci Fi
534. Synth Siren
535. Metal
536. Vinyl 1
537. Vinyl 2
538. Vinyl 3
539. Vinyl 4
540. Pink
541. White
542. Scratches 1
543. Scratches 2
544. Kicks 1
545. Kicks 2
546. Snares 1
547. Snares 2
548. Toms 1
549. Toms 2
550. Timbales 1
551. Timbales 2
552. Congas etc 1
553. Congas etc 2
554. Hats 1
555. Hats 2
556. Cymbals 1
557. Cymbals 2
558. Shakers
559. Maracas
560. Bells 1
561. Bells 2
562. Blocks 1
563. Blocks 2
564. Tams 1
565. Tams 2
566. Claps 1
567. Claps 2
568. Snaps
569. Clave
570. Vibraslap
571. Guiro
572. Cowbell
573. Agogos
574. Misc 1
575. Misc 2
576. kit:1
577. kit:2
578. kit:3
579. kit:4
580. kit:5
581. kit:6
582. kit:7
583. kit:8
584. kit:9
585. kit:10
586. kit:11
587. kit:12
588. kit:13
589. kit:14
590. kit:15
591. kit:16
592. GM Dance
593. Dance 1
594. Dance 2
595. Dance 3
596. Dance 4
597. Dance 5
598. Dance 6
599. Dance 7
600. Dance 8
601. Dance 9
602. Dance 10
603. Dance 11
604. Dance 12
605. Dance 13
606. Dance 14
607. Dance 15
608. Dance 16
609. Dance 17
610. Dance 18
611. Dance 19
612. Dance 20
613. Dance 21
614. Dance 22
615. Dance 23
616. Dance 24
617. Dance 25
618. Dance 26
619. Dance 27
620. Organ 1
621. Organ 2
622. Organ 3
623. Organ 4
624. Organ 5
625. Organ 6
626. UnisonString
627. Unison Brass
628. Brass 1
629. Brass 2
630. Brass 3
631. Brass 4
632. Brass 5
633. Brass 6
634. Brass 7
635. Brass 8
636. Brass 9
637. Brass 10
638. Brass 11
639. Brass 12
640. Brass 13
641. Brass 14
642. Brass 15
643. Brass 16
644. Brass 17
645. Brass 18
646. Brass 19
647. Brass 20
648. Trumpet FX 1
649. Trumpet FX 2
650. Trumpet FX 3
651. Trumpet FX 4
652. Trumpet FX 5
653. Sax FX 1
654. Sax FX 2
655. Sax FX 3
656. Blipp
657. Buzz Blip
658. Game
659. Disssss
660. Siren Loop
661. Bell
662. Klank
663. Metal
664. Slinky Q
665. Space Whip
666. Short Quack
667. Quack Ahhh
668. Bowser Bark
669. Chiffin
670. CMI Hot Air
671. L9000 Noise
672. Comon Vox
673. Odd Vox
674. Mmm Hmm
675. Ah Hah
676. EP Roll 1
677. EP Roll 2
678. EP Roll 3
679. EP Fog
680. Fat Low Syn
681. Bass Stab 1
682. Bass Stab 2
683. Gtr Hi Chuck
684. Gtr UpStroke
685. Gtr Scratch1
686. Gtr Scratch2
687. KleanGtrChuk
688. Gtr Jangle
689. Gtr Riff 1
690. Gtr Riff 2
691. Gtr Riff 3
692. Gtr FunkyHit
693. Another Gtr
694. Jazz Riff 1
695. Jazz Riff 2
696. Jazz Riff 3
697. GtrSlideRiff
698. Gtr PopSlide
699. Guitar Pop
700. Chord Chuck
701. Guitar Slide
702. Sad Guitar
703. Gtr Wawa 1
704. Gtr Wawa 2
705. Gtr Wawa 3
706. Gtr Wawa 4
707. Gtr Wawa 5
708. Gtr Wawa 6
709. Heavy Guitar
710. HeavyGtrDive
711. Drum Stab
712. Guit On It
713. Jazz Short
714. Blamp
715. Bass Slide
716. Hip Hop
717. Drum Stall
718. Stalled
719. Wind Down 1
720. Wind Down 2
721. Ripped
722. Space Wiggle
723. Sqweal Rev
724. Draggit
725. MC
726. Fun
727. SSSSystem 1
728. SSSSystem 2
729. Here
730. On It
731. Diss
732. Bow Wow
733. Diva Scratch
734. Organ Blip
735. Classic Tape
736. Out!
737. Punch It
738. Ork
739. Tape Stop
740. Zip
741. Tape Pull
742. Wild
743. Up
744. Away
745. Frenzy
746. Kick 1
747. Kick 2
748. Snare
749. Tite
750. Wazzup?
751. Barker
752. Plunger
753. Skipper
754. Fast
755. Kick 1
756. Kick 2
757. Kick 3
758. Kick 4
759. Kick 5
760. Kick 6
761. Kick 7
762. Kick 8
763. Kick 9
764. Kick 10
765. Kick 11
766. Kick 12
767. Kick 13
768. Kick 14
769. Kick 15
770. Kick 16
771. Kick 17
772. Kick 18
773. Kick 19
774. Kick 20
775. Kick 21
776. Kick 22
777. Kick 23
778. Kick 24
779. Kick 25
780. Kick 26
781. Kick 27
782. Kick 28
783. Kick 29
784. Kick 30
785. Kick 31
786. Kick 32
787. Kick 33
788. Kick 34
789. Kick 35
790. Kick 36
791. Kick 37
792. Kick 38
793. Kick 39
794. Kick 40
795. Kick 41
796. Kick 42
797. Kick 43
798. Kick 44
799. Kick 45
800. Kick 46
801. Kick 47
802. Kick 48
803. Kick 49
804. Kick 50
805. Kick 51
806. Kick 52
807. Kick 53
808. Kick 54
809. Kick 55
810. Kick 56
811. Kick 57
812. Snare 1
813. Snare 2
814. Snare 3
815. Snare 4
816. Snare 5
817. Snare 6
818. Snare 7
819. Snare 8
820. Snare 9
821. Snare 10
822. Snare 11
823. Snare 12
824. Snare 13
825. Snare 14
826. Snare 15
827. Snare 16
828. Snare 17
829. Snare 18
830. Snare 19
831. Snare 20
832. Snare 21
833. Snare 22
834. Snare 23
835. Snare 24
836. Snare 25
837. Snare 26
838. Snare 27
839. Snare 28
840. Snare 29
841. Snare 30
842. Snare 31
843. Snare 32
844. Snare 33
845. Snare 34
846. Snare 35
847. Snare 36
848. Snare 37
849. Snare 38
850. Snare 39
851. Snare 40
852. Snare 41
853. Snare 42
854. Snare 43
855. Snare 44
856. Snare 45
857. Snare 46
858. Snare 47
859. Snare 48
860. Snare 49
861. Snare 50
862. Snare 51
863. Snare 52
864. Snare 53
865. Snare 54
866. Snare 55
867. Snare 56
868. Snare 57
869. Snare 58
870. Snare 59
871. Snare 60
872. Snare 61
873. Snare 62
874. Snare 63
875. Snare 64
876. Snare 65
877. Snare 66
878. Snare 67
879. Snare 68
880. Snare 69
881. Snare 70
882. Snare 71
883. Snare 72
884. Snare 73
885. Snare 74
886. Snare 75
887. Snare 76
888. Snare 77
889. Snare 78
890. Snare 79
891. Snare 80
892. Snare 81
893. Snare 82
894. Snare 83
895. Snare 84
896. Snare 85
897. Snare 86
898. Snare 87
899. Snare 88
900. Snare 89
901. Snare 90
902. Snare 91
903. Snare 92
904. Snare 93
905. Snare 94
906. Snare 95
907. Snare 96
908. Snare 97
909. Snare 98
910. Snare 99
911. Snare 100
912. Snare 101
913. Snare 102
914. Snare 103
915. Snare 104
916. Snare 105
917. Snare 106
918. Tom 1
919. Tom 2
920. Tom 3
921. Tom 4
922. Tom 5
923. Tom 6
924. Tom 7
925. Tom 8
926. Tom 9
927. Tom 10
928. Tom 11
929. Tom 12
930. Tom 13
931. Tom 14
932. Tom 15
933. Tom 16
934. Tom 17
935. Tom 18
936. Tom 19
937. Tom 20
938. Tom 21
939. Tom 22
940. Tom 23
941. Tom 24
942. Tom 25
943. Tom 26
944. Timbale 1
945. Timbale 2
946. Timbale 3
947. Timbale 4
948. Timbale 5
949. Timbale 6
950. Conga 1
951. Conga 2
952. Conga 3
953. Conga 4
954. Conga 5
955. Conga 6
956. Conga 7
957. Conga 8
958. Conga 9
959. Conga 10
960. Bongo 1
961. Bongo 2
962. Bongo 3
963. Bongo 4
964. Bongo 5
965. Bongo 6
966. Bongo 7
967. Hat 1
968. Hat 2
969. Hat 3
970. Hat 4
971. Hat 5
972. Hat 6
973. Hat 7
974. Hat 8
975. Hat 9
976. Hat 10
977. Hat 11
978. Hat 12
979. Hat 13
980. Hat 14
981. Hat 15
982. Hat 16
983. Hat 17
984. Hat 18
985. Hat 19
986. Hat 20
987. Hat 21
988. Hat 22
989. Hat 23
990. Hat 24
991. Hat 25
992. Hat 26
993. Hat 27
994. Hat 28
995. Hat 29
996. Hat 30
997. Hat 31
998. Hat 32
999. Hat 33
1000. Hat 34
1001. Hat 35
1002. Hat 36
1003. Hat 37
1004. Hat 38
1005. Hat 39
1006. Hat 40
1007. Hat 41
1008. Hat 42
1009. Hat 43
1010. Hat 44
1011. Hat 45
1012. Hat 46
1013. Hat 47
1014. Hat 48
1015. Hat 49
1016. Hat 50
1017. Hat 51
1018. Hat 52
1019. Hat 53
1020. Hat 54
1021. Hat 55
1022. Hat 56
1023. Hat 57
1024. Hat 58
1025. Hat 59
1026. Hat 60
1027. Hat 61
1028. Hat 62
1029. Hat 63
1030. Hat 64
1031. Hat 65
1032. Hat 66
1033. Hat 67
1034. Hat 68
1035. Hat 69
1036. Hat 70
1037. Hat 71
1038. Hat 72
1039. Hat 73
1040. Hat 74
1041. Hat 75
1042. Hat 76
1043. Hat 77
1044. Hat 78
1045. Cymbal 1
1046. Cymbal 2
1047. Cymbal 3
1048. Cymbal 4
1049. Cymbal 5
1050. Cymbal 6
1051. Cymbal 7
1052. Cymbal 8
1053. Cymbal 9
1054. Cymbal 10
1055. Cymbal 11
1056. Cymbal 12
1057. Cymbal 13
1058. Cymbal 14
1059. Cymbal 15
1060. Cymbal 16
1061. Cymbal 17
1062. Cymbal 18
1063. Shaker 1
1064. Shaker 2
1065. Shaker 3
1066. Shaker 4
1067. Shaker 5
1068. Shaker 6
1069. Shaker 7
1070. Shaker 8
1071. Shaker 9
1072. Shaker 10
1073. Shaker 11
1074. Shaker 12
1075. Shaker 13
1076. Shaker 14
1077. Shaker 15
1078. Shaker 16
1079. Shaker 17
1080. Shaker 18
1081. Shaker 19
1082. Shaker 20
1083. Shaker 21
1084. Shaker 22
1085. Shaker 23
1086. Shaker 24
1087. Shaker 25
1088. Shaker 26
1089. Shaker 27
1090. Vibraslap
1091. Flexitone
1092. Bell Tree
1093. Slay Bells
1094. Bell 1
1095. Bell 2
1096. Bell 3
1097. Bell 4
1098. Bell 5
1099. Bell 6
1100. Bell 7
1101. Bell 8
1102. Bell 9
1103. Bell 10
1104. Bell 11
1105. Bell 12
1106. Bell 13
1107. Bell 14
1108. Bell 15
1109. Bell 16
1110. Bell 17
1111. Bell 18
1112. Bell 19
1113. Bell 20
1114. Bell 21
1115. Bell 22
1116. Bell 23
1117. Bell 24
1118. Bell 25
1119. Bell 26
1120. Bell 27
1121. Bell 28
1122. Bell 29
1123. Bell 30
1124. Bell 31
1125. Block 1
1126. Block 2
1127. Block 3
1128. Block 4
1129. Block 5
1130. Block 6
1131. Block 7
1132. Block 8
1133. Block 9
1134. Block 10
1135. Block 11
1136. Block 12
1137. Tam 1
1138. Tam 2
1139. Tam 3
1140. Tam 4
1141. Tam 5
1142. Tam 6
1143. Tam 7
1144. Tam 8
1145. Clap 1
1146. Clap 2
1147. Clap 3
1148. Clap 4
1149. Clap 5
1150. Clap 6
1151. Clap 7
1152. Clap 8
1153. Clap 9
1154. Clap 10
1155. Clap 11
1156. Clap 12
1157. Clap 13
1158. Clap 14
1159. Clap 15
1160. Clap 16
1161. Clap 17
1162. Snap 1
1163. Snap 2
1164. Snap 3
1165. Snap 4
1166. Snap 5
1167. Snap 6
1168. Misc 1
1169. Misc 2
1170. Misc 3
1171. Misc 4
1172. Misc 5
1173. Misc 6
1174. Misc 7
1175. Misc 8
1176. Misc 9
1177. Misc 10
1178. Misc 11
1179. Misc 12
1180. Misc 13
1181. Misc 14
1182. Misc 15
1183. Misc 16
1184. Misc 17
1185. Misc 18
1186. Misc 19
1187. Misc 20
1188. Misc 21
1189. Misc 22
1190. Misc 23
1191. Misc 24
1192. Misc 25
1193. Misc 26
1194. Misc 27
1195. Misc 28
1196. Misc 29
1197. Misc 30
1198. Misc 31
1199. Misc 32
1200. Misc 33
1201. Misc 34
1202. Misc 35
1203. Misc 36
1204. Misc 37
1205. Misc 38
1206. Misc 39
1207. Misc 40
1208. Misc 41
1209. Misc 42
1210. Misc 43
Downloads
E-MU XL-7 Operation Manual Rev. G
E-MU XL-7 & MP-7 Data Sheet
E-MU XL-7 & MP-7 v1.17 Addendum
Command Station v1.31 Addendum
Command Station v2.0 Addendum
Proteus Family SysEx 2.2 Specification
XL-7 Instrument Keymaps
Command Station Version 2.00 OS Upgrade
OS v1.00 through v1.10 users need to load Command Prep 10 to enable your Command Station to read new compressed OS files. Users with more recent OS versions (1.17 up) need only to install the new OS v2.00 (Command Prep not required).
Command Prep 10 for your E-MU Command Station Read Me
This Read Me file contains instructions for turning on the Command station for the OS download.
Command Prep 10
E-Loader Version 1.1 (PC)
E-Loader Version 1.1 (Mac)
E-Loader Operation Manual
XL-7 Songs and Patterns
XL-1 Preset Banks for XL-7 (.mid)
Video
Factory Reset & Diagnostics
This procedure destroys any presets stored in RAM.
1. Hold both Cursor buttons down (bellow the Data Wheel) and power on the unit.
2. Once booted up into the Diagnostics menu, turn the Data Wheel knob to Init Data Except Seq, NOT Initialize User Data.
Note: Initialize User Data will also erase the MIDI factory patterns and songs.
3. Press the Home/Enter button.
4. Press Home/Enter again to confirm.
5. Turn the unit off, wait a few seconds and turn the unit on.