
E-MU MP-7
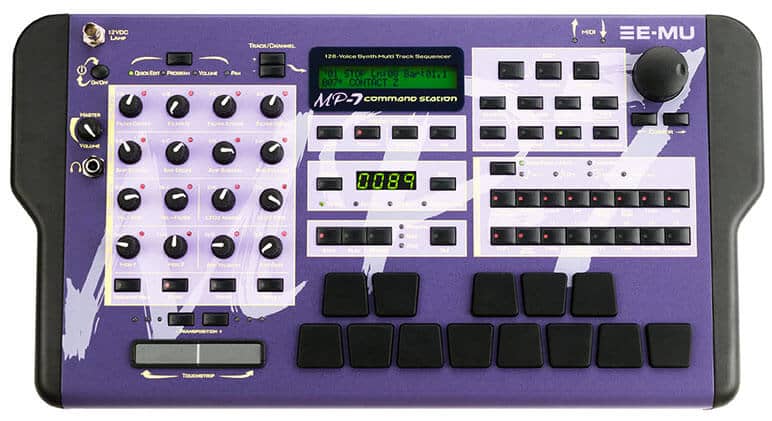
The E-MU MP-7 is a MPC-style desktop sequencer and uses the same sample-playback synthesis engine of the Proteus 2000. The sound ROM is based on the same sample set of the Pure Phatt, but with 116 different presets. This ROM has more “kits” type presets as the original Pure Phatt is more “beats” oriented.
Technical Specifications
ROM Size: 32MB
Sample Rate/Bitrate: 44.1kHz 16-bit
Presets: 1024 (512 RAM, 512 ROM)
Instruments: 1099
SIMM Sockets: 4
SuperBEATS Mode: Yes
Polyphony: 128 Voices
MIDI Channels: 32
Filters: 50 Z-Plane
FX: 76
MIDI Ports: 3
Audio Outs: 6
Digital Outs: S/PDIF
Foot Switch Ports: 2
USB: Yes
SIMM Specifications
SIMM Code Number: 15
Label: MP-7
LCD Display Name: MP-7
Banks: 4 Banks
Factory Demos
Preset & Instrument Listing
000. kit:Becky Boise
001. kit:Platinum
002. kit:Reaper
003. bas:SubLevel
004. gtr:Wah Getarrs
005. kit:Pun Chee
006. key:Chords&Hits
007. pad:Spirit Call
008. str:GothStrings
009. brs:”Pow”
010. kit:The Mo’Pho’
011. kit:Hive Jiver
012. syn:Plucky
013. bas:Slap Pop
014. gtr:Sexy Slider
015. pad:Cherubs
016. syn:Kutter
017. vox:theWatcher
018. key:SOOTCaSE’000
019. led:Handwormed
020. hit:PongPing
021. str:Sincerely
022. syn:Synelead
023. syn:Prof Brass
024. gtr:HardCore
025. bpm:Clockworx 1
026. gtr:General’sGtr
027. syn:SycoGirL
028. key:Klav Synth
029. str:MadDramA
030. hit:All 1
031. gtr:NyLonArP
032. bas:Juice
033. str:Harpo
034. pad:Synthetic
035. bas:YarsRevenge
036. pad:Blades
037. brs:SlapdatBrass
038. key:VINYL 73
039. key:FAR-FG-NUGEN
040. syn:LadyOrgan1
041. pad:QuietTime
042. led:Hopeless
043. gtr:Linky Fingaz
044. str:Ooops!
045. pad:Nitrogen
046. str:Pizz Strings
047. kit:YeaYeaZ
048. arp:SupermanSaw
049. key:Orgg Doggie
050. syn:TinkerToyz
051. pad:JP Layer
052. gtr:BedofFire
053. key:Phat Klav
054. prc:PHATTrSnares
055. kit:Betta Beata
056. led:AllJackedUp!
057. prc:Itchey
058. syn:DeGlown
059. syn:Magic Harp
060. kit:MuSic2DrIvBy
061. gtr:SyCoCry
062. vox:All Talk
063. bas:Digger Bass
064. gtr:Heavy
065. kit:Oh Yeah
066. kit:Jelly Belly
067. str:Old Movie
068. kit:Cool Guy
069. kit:FriscoLayer
070. gtr:Dist Dull
071. key:Stereo Labs
072. led:Pothole
073. syn:WePhattField
074. syn:Ohoooo!
075. sfx:MarsattaksII
076. key:Sitar 88
077. vox:Agony Agony
078. vox:Voicyst
079. sfx:BLABTAR
080. bas:Reedy Thang
081. amb:Underground
082. bas:Rez Ripper
083. pad:DeadMetal 1
084. syn:Pan Coyote
085. key:Piano Jam
086. key:Tiny Wonders
087. kit:Obsession
088. kit:Regal Gate
089. bas:Fretless
090. sfx:Sick Girl
091. sfx:KindaMuddy
092. syn:SPICEBOY:-)
093. gtr:Destruct
094. str:Fade It
095. hit:StrikezAgain
096. syn:REWIND
097. bas:Box O Bass
098. bas:Poppy
099. pad:OuterLimits
100. str:FakingIt
101. str:Section
102. str:Pizz&Sct MW
103. str:Nightmare
104. syn:SoftStuff
105. kit:10HiHatMode
106. str:MistyStrng
107. pad:StringLayer
108. pad:HiQ Skwarez
109. vox:FemmeDoTell
110. prc:Kix 1
111. prc:Kix 2
112. prc:Snares 1
113. prc:Snares 2
114. prc:Snares 3
115. prc:Hats 1
116. prc:Hats 2
117. prc:Cymbals
118. prc:CongasBongos
119. prc:ClapsnSnaps
120. prc:Toms
121. prc:Bells
122. prc:Claves
123. amb:LiquidBatz
124. prc:ShakeHerz
125. prc:Fill Me
126. prc:Misc
127. led:I Saw Worms
000. syn:Alkalined
001. syn:Auto Doom II
002. led:Touche
003. pad:Darth Works
004. key:Harp Klav
005. key:Tine Split
006. syn:VoxRoller
007. prc:Rainstick
008. prc:WhirlyBird
009. prc:Fills
010. prc:MO STacT Snr
011. prc:Scratches
012. prc:SciFi Toy 1
013. prc:SciFi Toy 2
014. hit:SaddyFace
015. gtr:Gener El
016. hit:All 2
017. prc:Thumb Piano
018. prc:Per Oct
019. prc:PerOctLink
020. gtr:NylonFantasy
021. brs:Crunchy
022. syn:Swapy Brass
023. bas:SubVocoder
024. brs:Blowhard
025. brs:Synth Brass
026. kit:TribeOMatic
027. bas:Standin
028. str:Ballad Harp
029. hit:Sucka Punch
030. key:CityGiggin
031. brs:Philta
032. brs:Biggg
033. gtr:WackaParty83
034. gtr:WackaParty2
035. gtr:Wacka 96
036. gtr:Wacka 113
037. gtr:Wacka 3 83
038. key:Crunch Klav
039. brs:Hitz
040. bas:Sonic Sine
041. vox:TB Eweew
042. gtr:Cyclone
043. sfx:DownTheDrain
044. arp:PhiltaSweepa
045. kit:09HiHatMode
046. bas:SubSonicTri
047. brs:Brass+Tine
048. sfx:YaYaYa
049. bas:Deeper
050. bas:Acid
051. bas:BelowaWoofer
052. bas:GutPunched
053. kit:WhatYouWant?
054. bas:It Too
055. brs:Lotsa
056. bas:Fishy
057. bas:SubOne
058. sfx:Brain Rot
059. bas:FuzzSubby
060. bas:SubTwo
061. bas:Pikes Pick
062. bas:SubFour
063. bas:SubFive
064. bas:Pick-A-Sub
065. bas:Phunky Slap
066. bas:Homisquare
067. bas:Crandle
068. bas:Frogged
069. bas:Babybass
070. bas:Soulfuzz
071. bas:Speakeasy
072. bas:BellyButton
073. bas:KeyOnate
074. bas:Prophet
075. bas:Persistent
076. bas:Squared
077. bas:TheoryBass
078. bas:MarkOther
079. bas:Analow
080. bas:Funk Pop 2
081. bas:Velo SlapPop
082. bas:Funky Finger
083. bas:Funky Pik
084. bas:Funk Wave
085. bas:Accidental
086. bas:Finger Bass
087. bas:Bagg
088. bas:Distroy
089. bas:Blip
090. bas:Hecho Itter
091. bas:Dubby
092. bas:Dubby 2
093. bas:Grit
094. bas:Dubby 3
095. bas:Obeidoo It
096. bas:Technoid
097. bas:Akoostik
098. bas:Plucky
099. bas:Harpbass
100. bas:Upright
101. gtr:Crybabe 1
102. gtr:Chop Drone
103. gtr:Wacka Talkin
104. gtr:Wacka Do
105. gtr:Chickn’1
106. gtr:Chickn’Dist
107. gtr:Chickn’Slide
108. gtr:Exciteable
109. gtr:Hen Drix
110. gtr:Lik Delay
111. gtr:Lik Choppy
112. gtr:Wackaloo
113. gtr:Willpy
114. gtr:Odlil
115. gtr:YeWah
116. gtr:Wah DisLik
117. gtr:Wah Not
118. gtr:Wah Scale 4
119. gtr:Wah Scale 7
120. gtr:Wah Upper
121. gtr:SpRinkel
122. hit:Blue Note
123. syn:WapperFuzz
124. syn:Slippery
125. gtr:DirtyNoter
126. kit:HappY’Z
127. str:Uni Strings
000. gtr:Wah Walker
001. syn:Sin Symph 1
002. gtr:Mood
003. gtr:Nylon
004. gtr:Nylon 2
005. gtr:Slide Hit
006. gtr:Fine Slide
007. gtr:Grit Slide
008. gtr:Strata
009. gtr:Strum Glass
010. gtr:Flange Pick
011. gtr:Grunge
012. syn:Cutting Thru
013. gtr:Slo Strum
014. gtr:Kraked Tube
015. gtr:Burnt
016. vox:Skylab
017. gtr:Slicer
018. gtr:Dissed Hit
019. gtr:Doom 1
020. pad:Drone 1
021. pad:Drone 2
022. pad:Drone Swirl
023. str:Ensemble 1
024. key:Frittering
025. hit:Guit n Hat
026. hit:Satisfying
027. hit:Org Creept
028. led:Deep Thought
029. led:70’s Lead
030. led:Guitlet
031. syn:Synthomatic
032. pad:Transform
033. key:Syco vox 88
034. vox:All Female
035. vox:All Male
036. gtr:Dev Bitter
037. key:So Kazual
038. key:RoBotRhodes
039. bas:DropOffSine1
040. bas:DropOffSine2
041. key:Org Basic
042. key:Klav Mav
043. syn:ReturnToZoo
044. str:Disco Diva
045. pad:DanceLitez
046. gtr:Weeoww
047. led:RaveEEEE
048. led:RaveAAHH
049. pad:AditivOrgan
050. pad:Trans
051. pad:Narwhal
052. str:Mondostring
053. kit:WideOne
054. kit:ThugItUp
055. kit:OnDaStreet
056. key:SYCO KOOL
057. pad:KnobbyTwirly
058. kit:PhilterFreak
059. kit:Nu Funk
060. kit:Relapse
061. kit:HardStep
062. rom:Play Thru
063. key:DEEPrTHaN?8
064. hit:Knock U Out
065. hit:Nice Under
066. hit:Splash
067. str:Suspence
068. key:Growl Drop
069. key:HarpsiFlange
070. str:HybridSweep
071. key:Kool Kord
072. key:Org Roll
073. key:Perk Organ
074. str:Synth String
075. key:Horror Glide
076. brs:Caliente
077. brs:Trump Slide
078. led:FantasyWormz
079. led:Asthma Wheez
080. led:Yearning
081. led:Reeder
082. led:Violetta
083. led:Stevie
084. sfx:Mr.Clean
085. sfx:Shield
086. sfx:Syclear
087. sfx:GoDzilaVsEmu
088. vox:Ahyeeyah
089. pad:Pulsar
090. hit:Carney Hits
091. hit:Brazit 1
092. hit:Brazit 2
093. hit:Brazit 3
094. hit:Multiphase
095. hit:Brazit 4
096. hit:Spizy
097. pad:Worry
098. str:Orchestsyn
099. syn:Grinder
100. syn:Weeperr
101. amb:Seascape
102. sfx:Wet Trippy
103. syn:Two Step
104. syn:Prosync
105. kit:Mo Dist
106. kit:Slappy
107. kit:DarkFlower
108. kit:Funk 4 Life
109. kit:Perky
110. kit:Crunch
111. kit:Klippy
112. kit:GM Two
113. kit:SubwayTunnel
114. kit:ClasikStudio
115. kit:Tracer
116. gtr:Vinylist
117. kit:Vilper
118. kit:DubItUp
119. kit:NewBeat
120. kit:CornaSto’
121. sfx:BlowinUp1MW
122. prc:ScratchMatic
123. kit:Construction
124. kit:NuMetal
125. bas:Cube Bass
126. bas:Iggio Basso
127. syn:Objections
000. vox:Dronodians C
001. kit:ItsUAgAIn?
002. kit:UainT@&#!
003. prc:Randition
004. prc:Ms.Alaneous
005. sfx:D’struCshunn
006. kit:Final Fill
007. str:StackedLegs
008. syn:FunkBut!
009. vox:SingingTB
010. vox:La Robofemme
011. kit:RiDe E-Z
012. kit:Doopy Dooy
013. kit:Krazy Kit
014. kit:SalsA Crunk
015. kit:Wobulator
016. kit:Lesster
017. key:NoMoreKlav
018. gtr:Phasy Strat
019. kit:A YO IIGHT
020. kit:GOOD MU Sic
021. syn:Sin Symph 2
022. hit:Dancerail
023. hit:BiggieOrch
024. kit:GuesWho’sBak
025. pad:Siren Spin
026. vox:Pretteeee.II
027. syn:OsterVoxer C
028. rom:I Like U
029. bas:Bo’s Bass
030. kit:TiME SquaRe
031. led:Replicant
032. syn:Synth Symph
033. syn:Cutter Lead
034. hit:Moody
035. gtr:Geet Pik
036. str:Sa-Spen Ful
037. key:Perc Klav
038. key:SiMPeL
039. sfx:theHitcher
040. key:Pretteeee…
041. led:DARKLEAD
042. amb:CosmicKlasik
043. syn:WAWIFLHEAD
044. vox:Voxcade
045. key:MO 88
046. key:Piano Blip
047. syn:After Pluck
048. key:Doodee
049. gtr:Gen X
050. key:KeyStonE
051. str:VIRGOE
052. syn:Buchla Boy
053. arp:AgonyOrgon
054. syn:Dreemy
055. key:MO’E DAN
056. key:StoneGroove
057. key:WaThunk
058. syn:CountryTalk
059. gtr:SprinkleItOn
060. kit:EasyRider
061. led:KritterChiff
062. kit:Stoopit
063. syn:SilkWerm
064. syn:LadyOrgan2
065. hit:Houseping
066. brs:Brashit
067. kit:Young Luv
068. pad:TheMadSweep
069. kit:Woo Kid
070. pad:JoVox
071. bas:Razza
072. led:RaveLine
073. led:SineWorm
074. led:ProphetLine
075. led:Worm4th
076. led:Wheezy
077. led:Homie
078. pad:OB Layer
079. amb:VocodAhhh…
080. key:PhatttTines
081. sfx:JedImindtrik
082. syn:Whisle Heave
083. key:FuTureRHodes
084. syn:PowerTool
085. pad:Luxury
086. led:Glue Tone
087. kit:MarchMadnezZ
088. key:Tine Fuzzies
089. gtr:Voyeur Trax
090. syn:BLASTO
091. bas:Melophase
092. key:IntoTheLight
093. gtr:Psycho
094. kit:7 HiHatMode
095. key:Touch Klav
096. hit:Evil 8bit
097. kit:WhatUstarted
098. kit:BabyDoll
099. kit:Lo Kit
100. led:Play Day
101. kit:U NO
102. prc:Hummer thumb
103. kit:My Main Man
104. vox:Releaser$
105. scr:ItPlat Num
106. arp:Nefarious
107. prc:HiHatMono 1
108. prc:HiHatMono 2
109. key:Skini Klav
110. prc:Bells Mono
111. key:HipHopTines1
112. key:HipHopTines2
113. led:Reedy Leed
114. led:Screamer
115. led:MonoBrass
116. pad:Chasers MW
117. key:TremblRODES
118. pad:MeltingHartz
119. arp:Low&Square
120. sfx:Tin Man
121. str:Pitzy Pluck
122. led:Slo Sex
123. key:Love Phase
124. key:NerveOrgan
125. key:ReBeckTines
126. key:Mutten Org
127. :Default v1.0
0000. :None
0001. bas:The Deepest
0002. bas:Hummertime
0003. bas:WoofaWrekka
0004. bas:Hella Boom
0005. bas:Decision’99
0006. bas:Acid 1
0007. bas:Acid 2
0008. bas:Crandle
0009. bas:Frog Factory
0010. bas:Talk2MeBaby
0011. bas:Soulified
0012. bas:Speakeasy
0013. bas:Warm Welcome
0014. bas:Belly-Button
0015. bas:KeyONate
0016. bas:TheOtherMarc
0017. bas:Closer To It
0018. bas:Fish Fry
0019. bas:Prophet
0020. bas:In Theory
0021. bas:Persistence
0022. bas:Funk Pop 1
0023. bas:Funk Pop2
0024. bas:Funk Slap
0025. bas:SlapPopSwtch
0026. bas:Funk Finger
0027. bas:Funk Hollow
0028. bas:Funk Pick
0029. bas:Funk Wave 1
0030. bas:Funk Wave 2
0031. bas:Accidental
0032. bas:Finger Bass
0033. bas:Bagg
0034. bas:Destroyer
0035. bas:Blipp
0036. bas:Echo Hitter
0037. bas:DubbyDoRite
0038. bas:Dub 2
0039. bas:GrittyStanda
0040. bas:Gritty Pulla
0041. bas:Krafty 1
0042. bas:Krafty 2
0043. bas:Swing Hitter
0044. bas:Technoid
0045. bas:Bender Hit
0046. bas:Synth Boom
0047. bas:PluckySynth
0048. bas:HarpOneShot1
0049. bas:HarpOneShot2
0050. bas:HarpOneShot3
0051. bas:Upright One
0052. bas:SP Stand-Up
0053. bas:Bass Slide
0054. bas:FX F#0-B0
0055. gtr:All Wahs
0056. gtr:Crybaby Wah1
0057. gtr:Crybaby Wah2
0058. gtr:5strkchuck83
0059. gtr:Wow Wacka 83
0060. gtr:WackaGruv283
0061. gtr:Wah Jan 83
0062. gtr:Wacka 96bpm
0063. gtr:Wah 96 2
0064. gtr:Wah 96 3
0065. gtr:CoolWaRif113
0066. gtr:WACKA Do 113
0067. gtr:113 Wackaloo
0068. gtr:Wah Coming
0069. gtr:Chickenpickr
0070. gtr:Chickjacked
0071. gtr:Chucka Run
0072. gtr:ExcitableWah
0073. gtr:Hendrix Wah
0074. gtr:LikethisLik
0075. gtr:Lil’ Chopper
0076. gtr:Lil’ Chukka
0077. gtr:Lil Wah Run
0078. gtr:Oddlilhitter
0079. gtr:Oh YEahWah
0080. gtr:Versa Wa
0081. gtr:Wah LikDis
0082. gtr:Wah Not?
0083. gtr:Wah Scale 1
0084. gtr:Wah Scale 2
0085. gtr:Wah Scale 3
0086. gtr:Wah Scale 4
0087. gtr:Wah Scale 5
0088. gtr:Wah Scale 6
0089. gtr:Wah Scale 7
0090. gtr:Wah Scaler
0091. gtr:Wah Scaler 2
0092. gtr:WahSurprised
0093. gtr:Wah Upper
0094. gtr:Walk On Waka
0095. gtr:Walker Wah
0096. gtr:Wuckit
0097. gtr:Funky Likka
0098. gtr:Squawk Hit
0099. gtr:Vinyl Mood
0100. gtr:1 Note Mute
0101. gtr:RapNylonWave
0102. gtr:R&B NylonWav
0103. gtr:EffectsD0-B0
0104. gtr:Happy Strum
0105. gtr:Sexy Slide 1
0106. gtr:Sexy Slide 2
0107. gtr:2StrokeStrum
0108. gtr:Fast Slider
0109. gtr:Fine Slider
0110. gtr:Nln Strum Dn
0111. gtr:Gritty Slide
0112. gtr:Knock 1
0113. gtr:Knock 2
0114. gtr:Squeak 1
0115. gtr:Squeak 2
0116. gtr:General Elec
0117. gtr:Strat 1 Shot
0118. gtr:NotherElWave
0119. gtr:Dis One Notr
0120. gtr:Funk Pop
0121. gtr:Pop 2
0122. gtr:Chord Bed
0123. gtr:Krackly Kord
0124. gtr:Amp Noise
0125. gtr:Amp Ped
0126. gtr:All Burners
0127. gtr:Hardcore
0128. gtr:Psycho Noise
0129. gtr:Fuzz Tone
0130. gtr:Slicer
0131. gtr:Dissed Hit
0132. gtr:Doooom
0133. pad:Drone 1
0134. pad:Drone 2
0135. pad:Drone 3
0136. pad:Sirens
0137. hit:Guit n Hat
0138. hit:Wah Kicker
0139. hit:Satisfying
0140. hit:SP12OrgChord
0141. hit:Weird Gtr
0142. led:DeepThoughts
0143. led:Fantastic70s
0144. led:Guitlet Wave
0145. syn:Synthomatic
0146. led:Transformed
0147. brs:Caliente!
0148. hit:Tpt Solo
0149. led:Hoodwormed
0150. led:Yearning 2 B
0151. led:ReedOPlenty
0152. led:AmberVioleta
0153. led:Stevie Rockz
0154. pad:Mr. Clean
0155. sfx:Shield
0156. sfx:Deadly Cycle
0157. sfx:Reaper
0158. vox:Atseeyeah
0159. pad:Pulsar
0160. gtr:1ShotElectra
0161. brs:CarnavalHits
0162. brs:Carnaval 1
0163. brs:Carnaval 2
0164. brs:Carnaval 3
0165. brs:Carnaval 4
0166. brs:Carnaval 5
0167. hit:Spicy Brass
0168. sfx:Worry Pad
0169. str:Orcha Chord
0170. hit:DeathStrike
0171. hit:Sweetness 1
0172. hit:Sweetness 2
0173. hit:QuirkyDrmBed
0174. hit:Intro Beat
0175. hit:Knock U Out!
0176. hit:Blip
0177. hit:Caprice
0178. hit:Sax Line
0179. gtr:Owp Hit
0180. hit:Bottom 1
0181. hit:Bottom 2
0182. hit:Nice Under
0183. hit:Nice Under 2
0184. hit:Righteous
0185. sfx:Cop Tone 1
0186. sfx:Cop Tone 2
0187. sfx:Beep Tone 1
0188. sfx:Beep Tone 2
0189. sfx:ComputerBeep
0190. sfx:Ping Beep
0191. hit:Key Kord min
0192. hit:X
0193. hit:Honk
0194. sfx:Dial 8
0195. sfx:Dial 6
0196. sfx:Dial 5
0197. sfx:Dial 4
0198. sfx:Dial 3
0199. sfx:Dial 2
0200. sfx:Dial 1
0201. hit:Annoy
0202. hit:Orchit
0203. brs:Waver Stab
0204. brs:40’s Horn
0205. sfx:Bat
0206. hit:Bass Note
0207. hit:Hatthang
0208. sfx:AmusemntCrwd
0209. hit:SynChord
0210. hit:Synthetic
0211. hit:Padlove
0212. hit:8 Bit Fright
0213. hit:Synth Ditty
0214. hit:House Chrd ?
0215. hit:HornStabber
0216. brs:Stabber
0217. sfx:JungleWiggly
0218. sfx:Wet Tripper
0219. hit:Dum Dum 1
0220. hit:Dum Dum 2
0221. hit:Jungle
0222. hit:Bongo Fury
0223. hit:Drop Off
0224. syn:2 Step
0225. hit:the Snap
0226. sfx:HookReverse
0227. brs:Tasty Lick
0228. brs:Next Tasty 1
0229. brs:NotherTasty
0230. brs:Next Tasty 2
0231. syn:Flutey
0232. hit:Brass Attack
0233. gtr:Single Next
0234. brs:Falling
0235. brs:Sfz
0236. syn:Grinder
0237. hit:HardSynStab1
0238. hit:HardSynStab2
0239. brs:Quirky Hit
0240. hit:StressRelief
0241. hit:Korn
0242. syn:Wheeeeper
0243. hit:It’s A…
0244. hit:It’s A nothr
0245. hit:Rap Zapper
0246. hit:Uplifter
0247. hit:Good’Nuff
0248. hit:Laser Strike
0249. hit:Wild Horns
0250. hit:Cluster
0251. hit:To the Point
0252. hit:Tentative
0253. hit:Mood Swing
0254. syn:Sea Story
0255. str:Fade Hit
0256. hit:Sentimental
0257. hit:DeD RINGER
0258. hit:Chord Ends
0259. hit:Monster
0260. hit:SP Super
0261. hit:With 2 Tts
0262. hit:Splashy
0263. str:SP Suspense
0264. hit:Weird Nylon
0265. hit:Sp Reversal
0266. gtr:Mood Riff
0267. syn:BrassProphet
0268. pad:Plucked Gold
0269. syn:Winny
0270. syn:P5 Sync
0271. wav:Sinusoid
0272. wav:Sine / 2
0273. wav:SineInvrt/2
0274. wav:Sine / 3
0275. wav:SineInvrt/3
0276. wav:Sawtooth
0277. wav:Square
0278. wav:Triangle
0279. key:010 El Tine
0280. key:1 Note Mello
0281. key:Nother1Noter
0282. key:010 FuzzTine
0283. key:Res 1 Shot
0284. key:Chords/Hits
0285. key:KoolOrgKord1
0286. key:Kool Kord 2
0287. key:Rhodes FX 1
0288. key:WindownLetGo
0289. key:Loop da Loop
0290. key:Growl Drop
0291. key:Org Roll 1
0292. key:Harpsinote
0293. hit:DanceKey1
0294. hit:DanceKey2
0295. hit:DanceKey3
0296. hit:DanceKey4
0297. hit:DanceKey5
0298. hit:Organ
0299. hit:Maj Org
0300. hit:DirtyTine
0301. hit:Piano Lick
0302. hit:In Concert
0303. key:Kool Kord
0304. key:Nother ‘No
0305. key:Perc Organ
0306. str:Interrupted
0307. str:Section Pizz
0308. str:Orch Harp
0309. str:Hybrid Synth
0310. str:Sctn Legato
0311. str:Synthetic
0312. str:MoodChrdStab
0313. str:Mood Stab 2
0314. str:Harp Gliss
0315. str:Screenplay
0316. str:Sp Loooopy
0317. hit:Brass Balls
0318. str:Hip Hop Pizz
0319. str:Big PluckHit
0320. str:Rap OrchRiff
0321. str:Heartbreaker
0322. vox:TB Ooh! 1
0323. vox:TB Ooh! 2
0324. vox:Talk Box Ooh
0325. vox:Talk Box Aha
0326. vox:Freak!
0327. vox:TBLet’sDance
0328. vox:Booms!
0329. vox:Doit!
0330. vox:Oh Yeahs!
0331. vox:Dan Cher 1
0332. vox:Dan Cher 2
0333. vox:Funky 1
0334. vox:Funky 2
0335. vox:All Vowels
0336. vox:AllNTPVowels
0337. vox:VowelEachOct
0338. vox:Vowel Train
0339. vox:Vowel Train2
0340. vox:Vocoder
0341. vox:All Men
0342. vox:All Femmes
0343. vox:Owwwwwwwwww
0344. vox:Screamer
0345. vox:YahWailer
0346. vox:Wassup???
0347. vox:Techno Yeah
0348. vox:Scratch Talk
0349. hit:Scratch Box
0350. vox:Podge
0351. syn:Vox Pad
0352. vox:TB Pad 1
0353. vox:TB Pad 2
0354. vox:Talk Brush
0355. gtr:DistantCry
0356. gtr:Heavy
0357. syn:Vox Roller
0358. vox:TB Boom 1
0359. vox:TB Boom 2
0360. vox:TB Boom 3
0361. vox:TB Boom 4
0362. vox:TB Boom 5
0363. vox:TB Boom 6
0364. vox:TB Do It 1
0365. vox:TB Do It 2
0366. vox:TB Do It 3
0367. vox:TB Do It 4
0368. vox:TB Do It 5
0369. vox:TB Oh Yeah 1
0370. vox:TB Oh Yeah 2
0371. vox:TB Oh Yeah 3
0372. vox:TB Oh Yeah 4
0373. vox:TB Oh Yeah 5
0374. vox:TB Oh Yeah 6
0375. vox:TB Oh Yeah 7
0376. vox:TB Vowel A
0377. vox:TB Vowel E
0378. vox:TB Vowel I
0379. vox:TB Vowel O
0380. vox:TB Vowel U
0381. vox:TB Vowel Ah
0382. vox:TB Vowel Eh
0383. vox:TB Vowel Uh
0384. vox:TB Vowel Oo
0385. vox:Gina Ew 1
0386. vox:Gina Ew 2
0387. vox:Earth Lisa
0388. vox:Male 1
0389. vox:Male 2
0390. vox:Male 3
0391. vox:Male 4
0392. vox:Male 5
0393. vox:Male 6
0394. vox:Male 7
0395. vox:Male 8
0396. vox:Male 9
0397. vox:Male 10
0398. vox:Femme 1
0399. vox:Femme 2
0400. vox:Femme 3
0401. vox:Femme 4
0402. vox:Femme 5
0403. vox:Femme 6
0404. vox:Femme 7
0405. vox:Femme 8
0406. vox:Femme 9
0407. vox:Femme 10
0408. vox:Femme 11
0409. vox:Femme 12
0410. vox:Femme 13
0411. key:Farfisa Low
0412. key:Farfisa
0413. key:Vox Organ
0414. key:Organ 1
0415. key:Organ 2
0416. key:Org Day
0417. key:Org Nod
0418. key:Org Lite
0419. key:Disco Organ
0420. key:DX Organ
0421. key:JX Organ
0422. led:Full Force
0423. syn:Brite Brass
0424. syn:Muted Brass
0425. syn:Classic 1
0426. syn:Classic 2
0427. syn:EdgyVeryEdgy
0428. syn:Tone Wall
0429. syn:Jungle Lead
0430. led:Wormy 1
0431. led:Wormy 2
0432. led:Wormy 3
0433. led:H20
0434. syn:Wave Cutter
0435. syn:Rail to Rail
0436. key:Klavin It
0437. key:Klav Love
0438. key:Klav Love b
0439. syn:Buzz Wave
0440. prc:All Kicks 1
0441. prc:All Kicks 2
0442. prc:Kicks2 Tuned
0443. prc:All Snares 1
0444. prc:All Snares 2
0445. prc:All Snares 3
0446. prc:KikSnarePlc1
0447. prc:All Hats 1
0448. prc:All Hats 2
0449. prc:All Cymbals
0450. prc:Rainstick
0451. prc:Whirlybird
0452. prc:All Stix
0453. prc:All Bongos
0454. prc:AllClaps&Snp
0455. prc:All Claves
0456. prc:All Toms
0457. prc:All Bells
0458. prc:All Fills
0459. prc:All Shakers
0460. scr:AllScratches
0461. prc:All Misc
0462. sfx:ScaryBastard
0463. prc:Sci Fi Toy 1
0464. prc:Sci Fi Toy 2
0465. prc:Thumpiano
0466. scr:Scratch Map
0467. scr:Scratch Talk
0468. scr:Rodeo Roper
0469. scr:ChipmunkRap
0470. scr:StuttrSteppr
0471. scr:Whale Backer
0472. scr:Nother Drop
0473. scr:Hiccup
0474. scr:Rotator
0475. scr:Hard Drop
0476. prc:Shaker Loop
0477. prc:St Flexi 1
0478. prc:Flexi 2
0479. prc:Flexi 3
0480. prc:Flexi 4
0481. prc:Flexi 5
0482. kit:Lily GM1
0483. kit:Lily GM2
0484. kit:Lily GM3
0485. kit:Lily GM4
0486. kit:Lily GM5
0487. kit:Funky GM One
0488. kit:Funky GM 2
0489. kit:Funky GM 3
0490. kit:Funky 4
0491. kit:Funky 5
0492. kit:Funky 6
0493. prc:Kick 1
0494. prc:Kick 2
0495. prc:Kick 3
0496. prc:Kick 4
0497. prc:Kick 5
0498. prc:Kick 6
0499. prc:Kick 7
0500. prc:Kick 8
0501. prc:Kick 9
0502. prc:Kick 10
0503. prc:Kick 11
0504. prc:Kick 12
0505. prc:Kick 13
0506. prc:Kick 14
0507. prc:Kick 15
0508. prc:Kick 16
0509. prc:Kick 17
0510. prc:Kick 18
0511. prc:Kick 19
0512. prc:Kick 20
0513. prc:Kick 21
0514. prc:Kick 22
0515. prc:Kick 23
0516. prc:Kick 24
0517. prc:Kick 25
0518. prc:Kick 26
0519. prc:Kick 27
0520. prc:Kick 28
0521. prc:Kick 29
0522. prc:Kick 30
0523. prc:Kick 31
0524. prc:Kick 32
0525. prc:Kick 33
0526. prc:Kick 34
0527. prc:Kick 35
0528. prc:Kick 36
0529. prc:Kick 37
0530. prc:Kick 38
0531. prc:Kick 39
0532. prc:Kick 40
0533. prc:Kick 41
0534. prc:Kick 42
0535. prc:Kick 43
0536. prc:Kick 44
0537. prc:Kick 45
0538. prc:Kick 46
0539. prc:Kick 47
0540. prc:Kick 48
0541. prc:Kick 49
0542. prc:Kick 50
0543. prc:Kick 51
0544. prc:Kick 52
0545. prc:Kick 53
0546. prc:Kick 54
0547. prc:Kick 55
0548. prc:Kick 56
0549. prc:Kick 57
0550. prc:Kick 58
0551. prc:Kick 59
0552. prc:Kick 60
0553. prc:Kick 61
0554. prc:Kick 62
0555. prc:Kick 63
0556. prc:Kick 64
0557. prc:Kick 65
0558. prc:Kick 66
0559. prc:Kick 67
0560. prc:Kick 68
0561. prc:Kick 69
0562. prc:Kick 70
0563. prc:Kick 71
0564. prc:Kick 72
0565. prc:Kick 73
0566. prc:Kick 74
0567. key:Tine Chord 1
0568. key:Tine Chord 2
0569. key:Tine Chord 3
0570. key:Tine Chord 4
0571. key:Tine Chord 5
0572. key:Tine Chord 6
0573. key:Tine Chord 7
0574. key:Tine Hit 1
0575. key:Tine Hit 2
0576. key:Tine Hit 3
0577. key:Tine Hit 4
0578. key:Tine Hit 5
0579. key:Tine Hit 6
0580. key:Tine Hit 7
0581. prc:Snare 1
0582. prc:Snare 2
0583. prc:Snare 3
0584. prc:Snare 4
0585. prc:Snare 5
0586. prc:Snare 6
0587. prc:Snare 7
0588. prc:Snare 8
0589. prc:Snare 9
0590. prc:Snare 10
0591. prc:Snare 11
0592. prc:Snare 12
0593. prc:Snare 13
0594. prc:Snare 14
0595. prc:Snare 15
0596. prc:Snare 16
0597. prc:Snare 17
0598. prc:Snare 18
0599. prc:Snare 19
0600. prc:Snare 20
0601. prc:Snare 21
0602. prc:Snare 22
0603. prc:Snare 23
0604. prc:Snare 24
0605. prc:Snare 25
0606. prc:Snare 26
0607. prc:Snare 27
0608. prc:Snare 28
0609. prc:Snare 29
0610. prc:Snare 30
0611. prc:Snare 31
0612. prc:Snare 32
0613. prc:Snare 33
0614. prc:Snare 34
0615. prc:Snare 35
0616. prc:Snare 36
0617. prc:Snare 37
0618. prc:Snare 38
0619. prc:Snare 39
0620. prc:Snare 40
0621. prc:Snare 41
0622. prc:Snare 42
0623. prc:Snare 43
0624. prc:Snare 44
0625. prc:Snare 45
0626. prc:Snare 46
0627. prc:Snare 47
0628. prc:Snare 48
0629. prc:Snare 49
0630. prc:Snare 50
0631. prc:Snare 51
0632. prc:Snare 52
0633. prc:Snare 53
0634. prc:Snare 54
0635. prc:Snare 55
0636. prc:Snare 56
0637. prc:Snare 57
0638. prc:Snare 58
0639. prc:Snare 59
0640. prc:Snare 60
0641. prc:Snare 61
0642. prc:Snare 62
0643. prc:Snare 63
0644. prc:Snare 64
0645. prc:Snare 65
0646. prc:Snare 66
0647. prc:Snare 67
0648. prc:Snare 68
0649. prc:Snare 69
0650. prc:Snare 70
0651. prc:Snare 71
0652. prc:Snare 72
0653. prc:Snare 73
0654. prc:Snare 74
0655. prc:Snare 75
0656. prc:Snare 76
0657. prc:Snare 77
0658. prc:Snare 78
0659. prc:Snare 79
0660. prc:Snare 80
0661. prc:Snare 81
0662. prc:Snare 82
0663. prc:Snare 83
0664. prc:Snare 84
0665. prc:Snare 85
0666. prc:Snare 86
0667. prc:Snare 87
0668. prc:Snare 88
0669. prc:Snare 89
0670. prc:Snare 90
0671. prc:Snare 91
0672. prc:Snare 92
0673. prc:Snare 93
0674. prc:Snare 94
0675. prc:Snare 95
0676. prc:Snare 96
0677. prc:Snare 97
0678. prc:Snare 98
0679. prc:Snare 99
0680. prc:Snare 100
0681. prc:Snare 101
0682. prc:Snare 102
0683. prc:Snare 103
0684. prc:Snare 104
0685. prc:Snare 105
0686. prc:Snare 106
0687. prc:Snare 107
0688. prc:Snare 108
0689. prc:Snare 109
0690. prc:Snare 110
0691. prc:Snare 111
0692. prc:Snare 112
0693. prc:Snare 113
0694. prc:Snare 114
0695. prc:Snare 115
0696. prc:Snare 116
0697. prc:Snare 117
0698. prc:Snare 118
0699. prc:Snare 119
0700. prc:Snare 120
0701. prc:Snare 121
0702. prc:Snare 122
0703. prc:Snare 123
0704. prc:Snare 124
0705. prc:Snare 125
0706. prc:Snare 126
0707. prc:Snare 127
0708. prc:Snare 128
0709. prc:Snare 129
0710. prc:Snare 130
0711. prc:Snare 131
0712. prc:Snare 132
0713. prc:Snare 133
0714. prc:Snare 134
0715. prc:Snare 135
0716. prc:Snare 136
0717. prc:Snare 137
0718. prc:Snare 138
0719. prc:Snare 139
0720. prc:Snare 140
0721. prc:Snare 141
0722. prc:Snare 142
0723. prc:Snare 143
0724. prc:Snare 144
0725. prc:Snare 145
0726. prc:Snare 146
0727. prc:Snare 147
0728. prc:Snare 148
0729. prc:Snare 149
0730. prc:Snare 150
0731. prc:Snare 151
0732. prc:Snare 152
0733. prc:Snare 153
0734. prc:Snare 154
0735. prc:Snare 155
0736. prc:Snare 156
0737. prc:Snare 157
0738. prc:Snare 158
0739. prc:Snare 159
0740. prc:Snare 160
0741. prc:Snare 161
0742. prc:Snare 162
0743. prc:Snare 163
0744. prc:Snare 164
0745. prc:Snare 165
0746. prc:Snare 166
0747. prc:Snare 167
0748. prc:Snare 168
0749. kit:Nu Soul
0750. kit:80s+Drm&Bass
0751. kit:Electronica1
0752. kit:Dub Reggae
0753. kit:DarkBeats
0754. kit:DarkBeats2
0755. kit:LoFi Kit
0756. kit:Nu Metal
0757. hit:All Hits 1
0758. rom:Thru Memory
0759. rom:Vowels
0760. hit:All Hits 2
0761. kit:1NoHats
0762. kit:1NoKickSnare
0763. kit:2NoHats
0764. kit:2NoKickSnare
0765. kit:3NoHats
0766. kit:3NoKickSnare
0767. kit:4NoHats
0768. kit:4NoKickSnare
0769. kit:5NoHats
0770. kit:5NoKickSnare
0771. kit:6NoHats
0772. kit:6NoKickSnare
0773. kit:7NoHats
0774. kit:7NoKickSnare
0775. kit:8NoHats
0776. kit:8NoKickSnare
0777. kit:9NoHats
0778. kit:9NoKickSnare
0779. kit:10NoHats
0780. kit:10NoKikSnare
0781. kit:11NoHats
0782. kit:11NoKikSnare
0783. kit:12NoHats
0784. kit:12NoKikSnare
0785. kit:13NoHats
0786. kit:13NoKikSnare
0787. kit:14NoHats
0788. kit:14NoKikSnare
0789. kit:15NoHats
0790. kit:15NoKikSnare
0791. kit:16NoHats
0792. kit:16NoKikSnare
0793. kit:17NoHats
0794. kit:17NoKikSnare
0795. kit:18NoHats
0796. kit:18NoKikSnare
0797. kit:19NoHats
0798. kit:19NoKikSnare
0799. gtr:Scrape 1
0800. gtr:Strum Up
0801. gtr:Strum Down
0802. gtr:Bonk
0803. gtr:Chop
0804. gtr:Pick Noise
0805. vox:All Talkbox
0806. str:StackedLegs
0807. prc:Hat 1
0808. prc:Hat 2
0809. prc:Hat 3
0810. prc:Hat 4
0811. prc:Hat 5
0812. prc:Hat 6
0813. prc:Hat 7
0814. prc:Hat 8
0815. prc:Hat 9
0816. prc:Hat 10
0817. prc:Hat 11
0818. prc:Hat 12
0819. prc:Hat 13
0820. prc:Hat 14
0821. prc:Hat 15
0822. prc:Hat 16
0823. prc:Hat 17
0824. prc:Hat 18
0825. prc:Hat 19
0826. prc:Hat 20
0827. prc:Hat 21
0828. prc:Hat 22
0829. prc:Hat 23
0830. prc:Hat 24
0831. prc:Hat 25
0832. prc:Hat 26
0833. prc:Hat 27
0834. prc:Hat 28
0835. prc:Hat 29
0836. prc:Hat 30
0837. prc:Hat 31
0838. prc:Hat 32
0839. prc:Hat 33
0840. prc:Hat 34
0841. prc:Hat 35
0842. prc:Hat 36
0843. prc:Hat 37
0844. prc:Hat 38
0845. prc:Hat 39
0846. prc:Hat 40
0847. prc:Hat 41
0848. prc:Hat 42
0849. prc:Hat 43
0850. prc:Hat 44
0851. prc:Hat 45
0852. prc:Hat 46
0853. prc:Hat 47
0854. prc:Hat 48
0855. prc:Hat 49
0856. prc:Hat 50
0857. prc:Hat 51
0858. prc:Hat 52
0859. prc:Hat 53
0860. prc:Hat 54
0861. prc:Hat 55
0862. prc:Hat 56
0863. prc:Hat 57
0864. prc:Hat 58
0865. prc:Hat 59
0866. prc:Hat 60
0867. prc:Hat 61
0868. prc:Hat 62
0869. prc:Hat 63
0870. prc:Hat 64
0871. prc:Hat 65
0872. prc:Hat 66
0873. prc:Hat 67
0874. prc:Hat 68
0875. prc:Hat 69
0876. prc:Hat 70
0877. prc:Hat 71
0878. prc:Hat 72
0879. prc:Hat 73
0880. prc:Hat 74
0881. prc:Hat 75
0882. prc:Hat 76
0883. prc:Hat 77
0884. prc:Cymbal 1
0885. prc:Cymbal 2
0886. prc:Cymbal 3
0887. prc:Cymbal 4
0888. prc:Cymbal 5
0889. prc:Cymbal 6
0890. prc:Cymbal 7
0891. prc:Cymbal 8
0892. prc:Cymbal 9
0893. prc:Cymbal 10
0894. prc:Cymbal 11
0895. prc:Cymbal 12
0896. prc:Cymbal 13
0897. prc:Cymbal 14
0898. prc:Cymbal 15
0899. prc:Cymbal 16
0900. prc:Cymbal 17
0901. prc:Cymbal 18
0902. prc:Cymbal 19
0903. prc:Cymbal 20
0904. prc:Bongo 1
0905. prc:Bongo 2
0906. prc:Bongo 3
0907. prc:Bongo 4
0908. prc:Bongo 5
0909. prc:Bongo 6
0910. prc:Bongo 7
0911. prc:Bongo 8
0912. prc:Bongo 9
0913. prc:Bongo 10
0914. prc:Bongo 11
0915. prc:Bongo 12
0916. prc:Bongo 13
0917. prc:Bongo 14
0918. prc:Bongo 15
0919. prc:Bongo 16
0920. prc:Bongo 17
0921. prc:Claps&Snp 1
0922. prc:Claps&Snp 2
0923. prc:Claps&Snp 3
0924. prc:Claps&Snp 4
0925. prc:Claps&Snp 5
0926. prc:Claps&Snp 6
0927. prc:Claps&Snp 7
0928. prc:Claps&Snp 8
0929. prc:Claps&Snp 9
0930. prc:Claps&Snp 10
0931. prc:Claps&Snp 11
0932. prc:Claps&Snp 12
0933. prc:Claps&Snp 13
0934. prc:Claps&Snp 14
0935. prc:Clave 1
0936. prc:Clave 2
0937. prc:Clave 3
0938. prc:Clave 4
0939. prc:Clave 5
0940. prc:Clave 6
0941. prc:Clave 7
0942. prc:Clave 8
0943. prc:Clave 9
0944. prc:Clave 10
0945. prc:Clave 11
0946. prc:Clave 12
0947. prc:Clave 13
0948. prc:Clave 14
0949. prc:Clave 15
0950. prc:Clave 16
0951. prc:Clave 17
0952. prc:Tom 1
0953. prc:Tom 2
0954. prc:Tom 3
0955. prc:Tom 4
0956. prc:Tom 5
0957. prc:Tom 6
0958. prc:Tom 7
0959. prc:Tom 8
0960. prc:Tom 9
0961. prc:Tom 10
0962. prc:Tom 11
0963. prc:Tom 12
0964. prc:Tom 13
0965. prc:Tom 14
0966. prc:Tom 15
0967. prc:Tom 16
0968. prc:Tom 17
0969. prc:Tom 18
0970. prc:Tom 19
0971. prc:Tom 20
0972. prc:Tom 21
0973. prc:Tom 22
0974. prc:Bell 1
0975. prc:Bell 2
0976. prc:Bell 3
0977. prc:Bell 4
0978. prc:Bell 5
0979. prc:Bell 6
0980. prc:Bell 7
0981. prc:Bell 8
0982. prc:Bell 9
0983. prc:Bell 10
0984. prc:Bell 11
0985. prc:Bell 12
0986. prc:Bell 13
0987. prc:Bell 14
0988. prc:Bell 15
0989. prc:Bell 16
0990. prc:Fill Etc 1
0991. prc:Fill Etc 2
0992. prc:Fill Etc 3
0993. prc:Fill Etc 4
0994. prc:Fill Etc 5
0995. prc:Fill Etc 6
0996. prc:Fill Etc 7
0997. prc:Fill Etc 8
0998. prc:Fill Etc 9
0999. prc:Fill Etc 10
1000. prc:Fill Etc 11
1001. prc:Shaker 1
1002. prc:Shaker 2
1003. prc:Shaker 3
1004. prc:Shaker 4
1005. prc:Shaker 5
1006. prc:Shaker 6
1007. prc:Shaker 7
1008. prc:Shaker 8
1009. prc:Shaker 9
1010. prc:Shaker 10
1011. prc:Shaker 11
1012. prc:Shaker 12
1013. prc:Shaker 13
1014. prc:Shaker 14
1015. prc:Shaker 15
1016. prc:Shaker 16
1017. prc:Shaker 17
1018. prc:Shaker 18
1019. prc:Shaker 19
1020. prc:Shaker 20
1021. prc:Shaker 21
1022. prc:Shaker 22
1023. prc:Shaker 23
1024. prc:Shaker 24
1025. prc:Shaker 25
1026. prc:Shaker 26
1027. prc:Shaker 27
1028. prc:Shaker 28
1029. prc:Shaker 29
1030. prc:Misc 1
1031. prc:Misc 2
1032. prc:Misc 3
1033. prc:Misc 4
1034. prc:Misc 5
1035. prc:Misc 6
1036. prc:Misc 7
1037. prc:Misc 8
1038. prc:Misc 9
1039. prc:Misc 10
1040. prc:Misc 11
1041. prc:Misc 12
1042. prc:Misc 13
1043. prc:Misc 14
1044. prc:Misc 15
1045. prc:Misc 16
1046. prc:Misc 17
1047. prc:Misc 18
1048. prc:Misc 19
1049. prc:Misc 20
1050. prc:Misc 21
1051. prc:Misc 22
1052. prc:Misc 23
1053. prc:Misc 24
1054. prc:Misc 25
1055. prc:Misc 26
1056. prc:Misc 27
1057. prc:Misc 28
1058. prc:Misc 29
1059. prc:Misc 30
1060. prc:Misc 31
1061. prc:Misc 32
1062. prc:Misc 33
1063. prc:Misc 34
1064. prc:Misc 35
1065. prc:Misc 36
1066. prc:Misc 37
1067. prc:Misc 38
1068. prc:Misc 39
1069. prc:Misc 40
1070. prc:Misc 41
1071. prc:Misc 42
1072. prc:Misc 43
1073. prc:Misc 44
1074. prc:Misc 45
1075. prc:Misc 46
1076. prc:Misc 47
1077. prc:Misc 48
1078. prc:Misc 49
1079. prc:Misc 50
1080. prc:Misc 51
1081. prc:Misc 52
1082. prc:Misc 53
1083. prc:Misc 54
1084. prc:Misc 55
1085. prc:Misc 56
1086. prc:Misc 57
1087. prc:Misc 58
1088. prc:Misc 59
1089. prc:Misc 60
1090. prc:Misc 61
1091. prc:Misc 62
1092. prc:Misc 63
1093. prc:Misc 64
1094. prc:Misc 65
1095. prc:Misc 66
1096. prc:Misc 67
1097. prc:Misc 68
1098. prc:Misc 69
1099. prc:Misc 70
Downloads
E-MU MP-7 Operation Manual Rev. G
E-MU XL-7 & MP-7 Data Sheet
E-MU XL-7 & Mp-7 v1.17 Addendum
Command Station v1.31 Addendum
Command Station v2.0 Addendum
Proteus Family SysEx 2.2 Specification
MP-7 Instrument Keymaps
Command Station Version 2.00 OS Upgrade
OS v1.00 through v1.10 users need to load Command Prep 10 to enable your Command Station to read new compressed OS files. Users with more recent OS versions (1.17 up) need only to install the new OS v2.00 (Command Prep not required).
Command Prep 10 for your E-MU Command Station Read Me
This Read Me file contains instructions for turning on the Command station for the OS download.
Command Prep 10
E-Loader Version 1.1 (PC)
E-Loader Version 1.1 (Mac)
E-Loader Operation Manual
MP-7 Songs and Patterns
Mo’Phatt Preset Banks for MP-7 (.mid)
Mo’Phatt Preset Banks for MP-7 (.smf)
Video
Factory Reset & Diagnostics
This procedure destroys any presets stored in RAM.
1. Hold both Cursor buttons down (bellow the Data Wheel) and power on the unit.
2. Once booted up into the Diagnostics menu, turn the Data Wheel knob to Init Data Except Seq, NOT Initialize User Data.
Note: Initialize User Data will also erase the MIDI factory patterns and songs.
3. Press the Home/Enter button.
4. Press Home/Enter again to confirm.
5. Turn the unit off, wait a few seconds and turn the unit on.